ULA+ BASIC workspace BASIC editor
version 2.0 universal
date: 5.2.2021
What's new in version 2.0 universal
-------------------------------------------
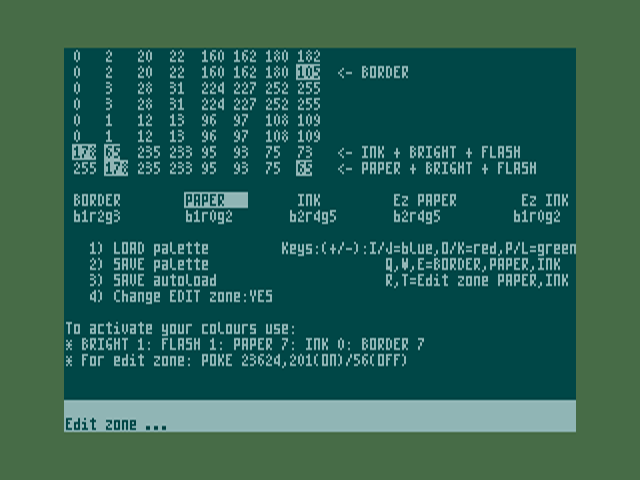
The version is still 2.0, but "universal" means it works on all ZX Spectrums fitted with ULA+. Although the TAP version you find in the package is aimed for Esxdos. The change for your system should be very simple, in the BASIC on lines 300- 310 you find LOAD/ SAVE operations which you can change to your system. Universal version cannot give extra colours to edit zone, since I count that ZX ROM cannot be rewritten. And that's it for this universal version.
What's the difference between "2.0a" and "2.0b" ?
--------------------------------------------------
"2.0a" can give extra colour to ink, but just the same colour to paper and border, while "2.0b" can give different colours to border, paper and ink. Why I made it so? It is simple, for 2.0a it is just enough to type NEW, or RANDOMIZE USR 0 and you have your desired ULA+ colours back. While with 2.0b, after NEW or RANDOMUZE USR 0, you additionally have to type BRIGHT 1: FLASH 1 to obtain your desired PAPER and INK colours. It cannot be done in any better way, since my prerequisite for universal version was that ZX ROM is not rewritable.
ESXDOS version "2.0a" and "2.0b"
------------------------------------
As said earlier, the versions you find in the TAP are tailor made for ESXDOS. And I would like to thank to SCJoe with help with Esxdos. You can automatically load your desired ULA+ colours by putting an AUTOBOOT.BAS file in your SYS folder, which will run ULA_WKSP file. An example of such +3DOS files has been put for you into TAP package as well. SCJoe is in preparation for Esxdos dot command which turns ULA+ on/off. Nice one.
version 2.0
date: 30.1.2021
What's new in version 2.0
-------------------------------
- colour selection is made by BRG components. Ie. you set blue, red and green individually. Blue intensity is 0-3, Red and Green are 0-7. This way can bring more precise colour settings. Use keys Q, W, E, R, T to select border, paper, ink, edit zone paper and edit zone ink respectively. Change intensity of blue, red and green components with I/J, O/K and P/L respectively.

version 1.0, released: 25.1.2021
Idea: Hood
Authors: Hood
Acknowledgements: Lanex, Busy

ULA+ workspace, 24.1.2021
------------------------------------
This program is MB03+ only at the moment. But could be adapted to any ZX platform, ideally with rewritable ROM.
It is written in BASIC and allows you to set your own ULA+ colours for your BASIC workspace. You can have any of 256 ULA+ colours on your BORDER, PAPER, INK and also EDIT zone. As a result it generates an executable code which you ideally place in your autoexe file or run at any time.
Additionally, it slightly rewrites several bytes in ROM. Ideally, also boot in MB03+ should be changed accordingly, but this is being in discussion.
How it works
------------------
I tried to write the program as clear as possible but certain understanding of ULA+ could be required which I will decribe later. First of all, the program uses 64 character a line enhancement. No matter which of the two included BASICs you run they both install 64 chars patch to your BSROM and run the main program.
How to set colours
------------------------
Any change you make is visible immediatelly, so once satisfied with the result, you may save it.
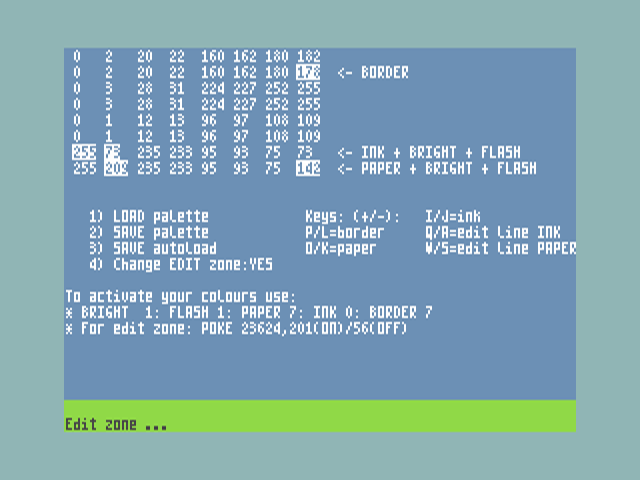
Use these keys:
"P,L" for BORDER change
"O,K" for PAPER change
"I,L" for INK change
"Q,A" for PAPER change in EDIT zone
"W,S" for INK change in EDIT zone
"1" to LOAD palette (palette is 64 bytes long file)
"2" to SAVE palette
"3" to SAVE autoload code, file name is "ula+_wksp"
"4" to toggle EDIT zone colour change ON/OFF
How to preserve your desired colours permanently
-----------------------------------------------------------------
Place the "ula+_wksp" file to your autoexe. It ensures your BASIC workspace will be always active after BSDOS booting process (key 1 in initial MB03+ boot menu).
However, most of cases, you get to BASIC by pressing "e" key after machine power up. So it would be ideal to adapt MB03+ boot menu but this is being discussed at the moment.
Once you activated your ULA+ workspace, any NEW or PRINT USR 0, will return you to your colours. Running "ula+_wksp" will always activate the colours again in case you lost your desired colours.
Your ULA+ colours are set by: BRIGHT 1: FLASH 1: PAPER 7: INK 0: BORDER 7 (or use "CLS 248" on MB03+).
For edit zone: you must "POKE 23624,201(ON)/56(OFF)"
Remember to switch ULA+ on.
How to return to ZX colours
-------------------------------------
1) switch off ULA+ with "OUT 48955,64: OUT 65339,0", then write "CLS 7" on MB03+ to avoid screen flashing.
2) change INK, PAPER, BORDER, FLASH and BRIGHT to any value different from the above. On MB03+ just write down eg.: CLS 7. ULA+ is still switched on.
Both ways are awkward (at least, you have to type it in, hopefully my nmi menu will deal with it in the future). That is baceause it was necessary to patch BSROM a little so that the palette would work all right.
Resume
----------
The best way maybe to take the original ULA+ palette (included in the package), the one closest to original colours, and start tweaking it for your need.
Deeper look inside follows. If you are merely a user, you do not have to read further
Your BASIC Workspace- BORDER, PAPER, INK
----------------------------------------------------------------
It was not an easy task to decide where to place ULA+ colours on ZX PAPER/INK position exactly. One thing was certain by ULA+ design- that was BORDER, which equals original ZX PAPER position.
Please, read ULA+ wiki, if you are an absolute ULA+ beginner, to understand further text.
ULA+ offers 256 colours but without a special code you may display only 64 of them. ULA+ has 64 registers only. In BASIC they are divided into 4 so called CLUTs (0-3). CLUT 0 is normal ZX colour positions, 0-7 for INK, 0-7 for PAPER. In order to get to another 3 CLUTS, you use BRIGHT 1 and FLASH 1 (or combination). So for BORDER, there were no choice as stated. For PAPER and INK colours, I selected CLUT 3, as this one should be rarely in use, since it uses FLASH 1 and BRIGHT 1. Yes, you guess right. BRIGHT and FLASH are not used for flashing and brightening your colours in ULA+ mode.
These are the ULA+ registers I selected (starting from 0):
BORDER= 15
PAPER= 63
INK= 49
We will see how these chosen positions will work in practical life.
EDIT zone:
---------------
ULA+ has 64 registers so why not to use them to colour also edit zone (2 lines at the very bottom of the screen). I selected these registers:
PAPER= 57
INK= 49
However, it required slight changes in ROM, to colour edit zone. So changing BORDER does not work anymore from BASIC. Well, it will work in your programs but during BASIC editing it does not. You must take it as it is.
Colour sorting:
-------------------
If you let display ULA+ colours in a row 1-255, it shows you horrible jumps from one colour shade to another, which can be hardly used for my purposes. I asked Busy and Lanex for help and Busy send me a BASIC generator for colour sorting where shades transform gradually. However, the result is still what I would not call ideal. I would love to group colour in shades, like blues, violets, reds, greens, etc. But this seems also as not 100% realisable, since many of the transition colours simply rank into more shades to the human eye. So this is a chalenge for next versions, too.
Conslusion
--------------
As you may see, it is much easier to switch on your ULA+ colours then switch them back to original ZX colours. It seems too complex to my eyes to have an easy solution here.
Version 1.0 is a starting version, mainly to open ULA+ beautiful colours to ZX BASIC workspace. It is far from ideal. Hopefully, some enhancements will be placed into next versions.
This program can be rewritten to work on another ZX platforms, but this needs to be discussed.
Acknowledgements:
--------------------------
Lanex for deeper look inside ULA+, Busy (who helped with colour sorting a great deal).

